Introduction
In this Enter the Gungeon guide, I will take you through all the different ways you can complete Enter the Gungeon, from simple to difficult. By the end, you will know all the various methods of reaching the end-game credits. You will understand what it means to beat Enter the Gungeon during this walkthrough and the whole story of the Gungeon.
The first and most straightforward way to defeat this game is to progress from the first to the fifth floor AKA the Chambers of the Gungeon, and face off against the dragon. Each gungeoneer’s past is why you’re in the gungeon in the first place. Therefore each gungeoneer is attempting to kill their past. The Dragun defends the gun that can kill the past in the Aimless Void.
To help you throughout your journey in the Gungeon, read this guide for our best tips and tricks.

Along the journey on the 5th floor, you’ll run into the blacksmith AKA the gunsmith, who clears you into the next quest you’ll need to beat Enter the Gungeon entirely. When you first visit the blacksmith, she tells you that the gun to kill the past requires a unique bullet to work correctly. Using the weapon without the particular bullet would only send your gungeoneers so far back into the past to the moment where their first steps in the gungeon began.
This information acts as a plot device to explain how doing so restarts the player back to the top of the gungeon, presenting the player with the next layer of defeating Enter the Gungeon, assembling the bullet that can kill the past. Fortunately, the blacksmith is willing to help you by forging the bullet to kill the past, but you’ll need to collect the parts for her; the four unique parts to the bullet exist on four different floors of the Gungeon.
Obtaining Bullet Parts to Kill the Past Run
The Prime Primer exists on the second floor. The Arcane Gunpowder will be on the third. The Planar Lead is on the fourth, and the Obsidian Shell Casing is on the fifth floor.
Before I explain how to get each of these items, there are two crucial things you need to know.
You don’t have to obtain these items and give them to the gunsmith in any particular order.
You don’t need to collect them in a single run. Once you get any of the previously mentioned items and deliver them to the blacksmith, you never need to redeliver the item again.
How to Get the Prime Primer

Starting with the first item of this Enter the Gungeon guide, you can obtain the Prime Primer on the second floor AKA The Gungeon Proper. It’s located in the shop and costs 110 shells to buy. If you skip buying items on the first few floors, you can get all the money you need by this point. However, if you struggle to make money, a more sure-proof way to get the extra cash is to go to the secret floor between the first and second floors called the Oubliette, AKA the Sewers.
How to Unlock/Access the Oubliette

To access the Oubliette, you will need 2 keys. To reveal the room that leads to the Oubliette, you must find a room that has a burning fireplace on the first floor and extinguish it. You can use a gun that shoots water or roll a barrel into the fireplace.
The barrel should be located within the room or in the room next to it. Be careful not to shoot the barrel or you may be unable to extinguish the fire. Once the fire is gone, go into the fireplace and interact with it. You will hear a sound and a hidden location will be revealed on the map. The new room will contain a grate with 2 locks, so do not use your keys if you are considering entering the Oubliette.
Killing all the enemies here will help make this money goal much more obtainable.

How to Get the Arcane Gunpowder

The second piece needed to assemble the bullet to kill the past is the Arcane Gunpowder. It’s located on the third floor and is named the Black Powder Mines. This one might seem complicated, but it’s straightforward once you know what to do.

A room with mine carts appears floating in midair on this floor. These minecarts are on invisible rail tracks, and you can ride these minecarts on these hidden tracks in one direction until you get to the next minecart and dodge roll from one to the other. Then, rinse and repeat till you reach the end and grab the Arcane Gunpowder.
Teleport out of the room instead of trying to take the mine carts back.
How to Get the Planar Lead

With the Arcane Gunpowder out of the way, let’s get to the third piece of the bullet, the Planar Lead planer on the fourth floor, The Hollow. On this level, you’ll come across a room with a big empty canyon pit. Across this large pit is an invisible path to cross if you know where to walk safely. You have some options here to help you reveal the hidden way across the canyon.

The first, which should be available to all starting gungeoneers, is to equip your starter gun with infinite ammo and point backward away from the side of the pit as you’re trying to cross. Fire and then reload. The reload animation will cause shells to fall on the ground, and you can test where the invisible path is using those shells. It’s arduous and slow, but you can keep doing this with trial and error until you reveal enough of the trail and get to the end to grab the Planar Lead.

Another strategy is to equip a gun that leaves liquid on the ground like the mega dowser and reveals the path ahead of you. Then, Dodge-roll safely to the other side and grab the Planar Lead when you get far enough along the invisible trail. Finally, teleport out of this room instead of trying to backtrack on the hidden paths.
How to Get the Obsidian Shell Casing

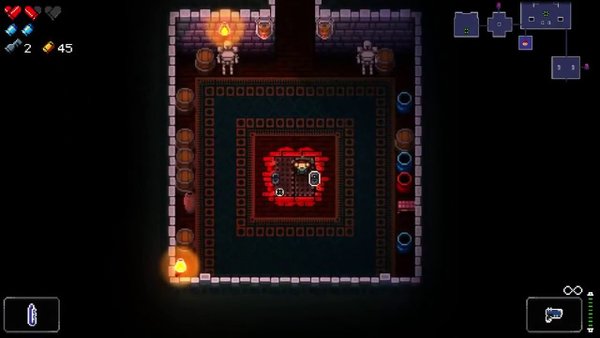
Finally, the Obsidian Shell Casing is the last piece you need for the bolt to kill the past. It’s located on the forge AKA the fifth floor. This one’s a little obscure for those who don’t already know, but after defeating the dragon, its skeleton and bones fall to the ground, including its skull. If you shoot the skull, you’ll find the Obsidian Shell Casing was hidden inside. Pick it up and bring it along with the other pieces to the blacksmith.

When all the items are delivered, she’ll make you the bullet to kill the past. Then, talking to her will give you the bullet without further requirements on every subsequent run after that.
Once you take the bullet from the blacksmith to the aimless void area where the gun to kill the past is. Instead of getting your typical end-game screen, you’ll be taken to the gungeoneer plane’s past. You’ll start with a new set of items for each past you play and lose any items you’ve collected along your current dungeon run.
Once you defeat the past for your gungeoneer, congratulate yourself! You’ve officially completed the gungeoneer’s main quest. The next layer of the gungeon story includes your journey to the final sixth floor, known as Bullet Hell, and defeating the Lich.
This will complete your guide on how to beat Enter the Gungeon.

Bullet Hell Run (Floor 6)
To gain access to the final floor, you’ll need to defeat the past of each starter gungeoneer:
- Marine
- Convict
- Pilot
- Hunter

After killing each of their past, start another gungeon run from the first floor, defeating the dragon again, and walk into the Aimless Void area. You’ll be grabbed by a skeleton hand and transported into Bullet Hell if you’ve done everything mentioned in this guide.
This level will have the most challenging enemies in rooms you’ve faced yet, but it will not have any shops or chest rooms. Additionally, long paths lead to either dead ends or loops, which drain your ammo and potentially reduce your health and armor. The only objective in Bullet Hell is to eventually navigate through enough paths to find the boss room, which contains the Lich.
Lich Boss Fight

This is a hard fight, so you must ensure you’re prepared. Read this guide for tips on how to survive the Gungeon.
Once you find the Lich, you need to defeat him in all three of his forms. We will give you a walkthrough of each form.
Lich First Form
In his first form, the Lich mostly stays in the center of the room and drifts toward the player. He has a few different attacks that spread large rings of bullets, sometimes with a slight rotating skew, and an attack that fires a single fast-homing shot. Additionally, he can spawn little Tombstone Gun Dead that are important to clear out before they cause too much of a headache.
Lich Second Form
After defeating the first form, you’ll be grabbed by the Lich’s skeletal hand and teleported to a new arena to fight the second phase of the Lich. In this phase, the Lich stays stationary, justified to the center top of the player. He has a handful of attacks that come directly from his location, but he can also send attacks from the left and right of the player.
Lich Third Form
This form is the toughest of all of his forms because it’s hard to find the space and time to respond to his attacks accordingly. To help with this, I suggest you try positioning yourself near the arena’s bottom center as much as possible. Then, you’ll have time to respond to the bullets coming from any direction.
Once you defeat this form of Lich, you’ll get sent to the final destination arena and face off against the third and final phase of the Lich. in his final form, the Lich will float toward the player and have a variety of attacks that cause him to either re-center on the map or rapidly move between the top and bottom of the arena.
This battle is tough, but stay calm and focus on your dodge roll. After you beat the third final phase of the Lich, you can use your gun to kill the past Lich himself and, in doing so, banish the evil that lingers in the gungeon.
This concludes the Enter the Gungeon Lick walkthrough.
Paradox/Gunslinger Run

The next chapter and layer of our Enter the Gungeon guide is the Paradox/Gunslinger run. The Lich ‘sort of’ turns out he’s an unlockable character. Before he was known as the Lich, he was a gungeoneer known as the Gunslinger. Up to this point in the game, you’ve been using the bullet to kill the past, but you can also use it to kill a gungeoneer’s future. So the objective of the Paradox is ‘How do we kill the Gunslinger’s future so that he never becomes the Lich?’.
How to Unlock the Paradox

You first need to unlock the gungeoneer known as the Paradox to kill the future, which makes all this nonsense even possible. To unlock the Paradox, you first need to defeat at least one gungeoneer’s past if you haven’t already and start another run through the gungeon to navigate through the second, third, and fourth floors until you see a purplish cosmic space rift in a random room. There is a 20% chance of this rift appearing.
Walk over to the rift and hit the interact button with your character, absorbing the rift. Next, you either need to kill the currently selected gungeoneer’s past or defeat the Lich with the Paradox rift on your selected gungeoneer. Afterward, going back to the character selection screen, you’ll see the Paradox available to play for five Hegemony Credits.
How to Unlock the Gunslinger

The Paradox gungeoneer has no past and starts with random starter guns and a random passive item. You need to unlock the Paradox gungeoneer to unlock the Gunslinger. To do that, you need to select the Paradox from the character selection screen, then complete an entire run from the first floor of the gungeon to Bullet Hell, ending with you defeating the standard 3 form Lich. This is no easy task, but you are still only halfway there after you’ve done this.
The Gunslinger is the final step towards the true ending of Enter the Gungeon.
The Gunslinger
Now that you’ve defeated the Lich as the Paradox, you get a special ending with you playing as the Gunslinger on floor one of the gungeon. The Gunslinger is a gungeoneer whose starter gun called Slinger, has good damage, range, accuracy, and reload time. Additionally, when reloading an empty magazine, the slinger gun is thrown, which has a chance to stun enemies. The best part of Gunslinger’s kit is that he starts the passive item called the Lich Eye Bullets, which have all guns activate their synergy abilities.
If you put any time into this game, you know how insane this Gunslinger’s passive ability is. Synergies can make your run completely broken. Guns like the cactus gun that start weak can become overpowered when synergies are active. Beware that you still haven’t unlocked Gunslinger permanently, though.
To unlock the Gunslinger, you need to go through all the floors of the gungeon as the Gunslinger until you reach the fifth floor and talk to the gunsmith to get the bullet that kills the past. Then defeat the Dragun, take the bullet to the gun that can kill the past, and shoot yourself. Afterward, you’ll be transported to Bullet Hell, where you’ll get one shot to kill your future.
The difference about this Bullet Hell is that you’ll now fight the Glitched Lich. Instead of fighting a standard Lich with three phases, you’ll fight two Liches simultaneously. one Lich is normal, and the other shoots jammed bullets and has increased health. Both are first phase Liches and follow the same patterns previously mentioned in this Enter the Gungeon guide. It is important to remember that you have to do this Gunslinger Paradox run all in one go. You must start the whole process ALL OVER AGAIN if you die as either character.
Gunslinger Run Tips
The Paradox/Gunslinger run is extremely tough, so here’s some advice that might help you.
Saving
While the Paradox Gunslinger run is pretty long, you can save between floors by talking to the button between the start and end of every floor.
Restart with Better Items
When you start the run as the Paradox, if you have the spare hegemony, don’t be afraid to do a quick restart if you don’t spawn with decent starter items. The Paradox starts with two weapons; a random starter from the other currently playable gungeoneers, a random sidearm, and a random passive item.
there’s a vast difference between starting with the pilot’s pistol combined with the past of limited use (Bad) and the blasphemy sword with cursed bullets (Good)
Focus on Passive Items During Gunslinger Section
When you get to the Gunslinger part of this process, I suggest you prefer passive items more than usual because of the Gunslinger’s passive. Unless you have terrible RNG, it won’t be long till you find a gun that can quickly clear rooms and another weapon that can clear out boss rooms. With those two roles filled in your gun loadout, picking up passives that increase damage or aid you in another way should be your priority.
Glitched Lich Boss Fight Strategy

Returning to the Glitched Lich himself, here are some things to consider. First, piercing bullets like the ones from the railgun or the passive status given by ghost bullets can be particularly helpful in this fight since you can shoot through one Lich and into the second simultaneously. Also, explosive bullets like the ones from the grenade launcher or bullets with the passive status given from explosive rounds are very nice since the explosions will destroy any enemy bullets that touch them. This effect will give you more breathing room to navigate the boss arena.
While there are two Liches in the room, the number of bullets you have to dodge is nearly impossible to manage even if you’re a dodge-rolling pro, so rely heavily on your blanks and explosive piercing bullets until you survive long enough to take down one of the two Liches. Once that’s done, you can take a small sigh of relief and focus on dodging between the bullets of the single remaining Lich.
After taking out the remaining Lich and killing the Gunslinger’s future, the last layer of challenge and story the gungeon offers is complete, and you’ve finally done it, so congratulations!